This article will give you a step-by-step instruction on how to build a contact form in TYPO3 version 9.
The form creation process consists of two main steps:
- creating the field template of the form
- then adding the form template as page content
Creating a form template
All form templates are listed in a left-side menu in 'Forms' section, where you can also create a new form with a help of the blue button (7.1.1)
 7.1.1
7.1.1After pressing 'Create a new form' button, a popup appears, where you need to add a form name (1), form storage (2) will be added automatically and then press 'Next' button (7.1.2)
'Form storage' refers to a folder in the filelist. If there is no 'Forms' folder available, please select 'User_upload' in the drop down menu.
 7.1.2
7.1.2After automatic processing of steps 2 and 3 another popup will appear (7.1.3), where you just need to press 'Next' button.
 7.1.3
7.1.3As a result you will see this working area: (7.1.4), where are 3 main sections:
- The left hand side shows you the structure of a form, which can be a single page or multiple pages to create a multistep form.
- The center area helps you to work with elements within a form, where you can choose the necessary fields.
- The right hand side contains main information of the form, if the root of the form is selected in the left hand side. Here you will be able to change the name of form and also add finishers, which defines how the form should be posted: receiving email address, redirecting to another page, showing the confirmation message etc.
When creating fields, specific field information will also be shown in this section.
 7.1.4
7.1.4If you have already created forms, you will find them listed when selecting 'Forms' in the left-hand menu. To create a new form, click either of the plus icon buttons (7.1.5)
 7.1.5
7.1.5Adding fields
To add new fields to your form, press 'Create new element' button (7.2.1)
 7.2.1
7.2.1A new popup will appear, where you can select what kind of field you wish to add (7.2.2)
 7.2.2
7.2.2After selecting the preferred field type, you can set its properties in the right-hand side.
Here you can add: the label (name) of the field (1), short description of the field (2), there is also an option to add a placeholder (3), which is a text shown inside the field, that can contain short instructions (when the visitor clicks inside the field, this text is automatically removed). Another option is to add a default value to the field (4) - this text has the same function as the placeholder, with the difference that it is not removed automatically when the visitor clicks inside the field. The field can be set to be required (5) so that it is not possible to post the form unless the field will be filled in properly.
The 'Validators' section (6) contains options to validate the field - this is used, for example: to make sure email input field is validated for a correct email address (7.2.3)
 7.2.3
7.2.3After adding fields to the form, don't forget to save! (7.2.4)
 7.2.4
7.2.4Deleting and moving fields
To move the field, hover over it, click and drag it to move in place.
To delete a field, hover over it, so that a trash can icon appears. Click the trash can to remove the field (7.3.1)
 7.3.1
7.3.1Form settings
After adding all the fields and their properties, click 'Settings' button to open the information on how the form should behave (7.4.1).
Here you can edit the Form name (1), name of submit button (2) and add finishers (3) - these are form settings, which identify how should the form behaves after the user filled in it: should it send an email to sender or email to receiver, should it redirect to a page, delete uploads, or the user just need to see the confirmation message or the form needs to be saved in BE folder after sending.
NOTE! The order of these finishers is very important. Posting processes should always come first, sending the email to reciever and sender. After that it should save the form and then delete uploads. The last finisher should be redirect to a page or confirmation message, letting the sender know that the message was sent (7.4.1).
 7.4.1
7.4.1Each finisher has a set of options, that should be filled in.
Each field has a dropdown menu, to be able to select already created fields in from the form, in order to make selection process easier (7.4.2)
 7.4.2
7.4.2E-mail to sender (7.4.3) - this function posts and sends e-mails to the visitor, which contains the information they filled out in the form. You can add a subject, recipient address - the e-mail address of the website visitor to which the e-mail is to be sent (you can use the drop-down menu to insert the form field containing the visitor's e-mail address), and you can also set the sender's e-mail - the sender's e-mail email address (such as your company email address or a noreply address) displayed in the website's email client. These are required fields and other fields are optional.
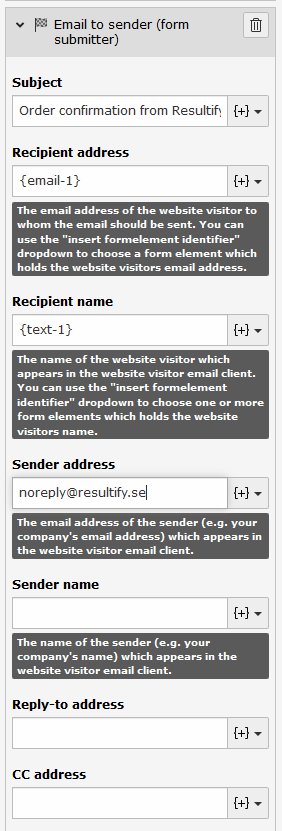 7.4.3
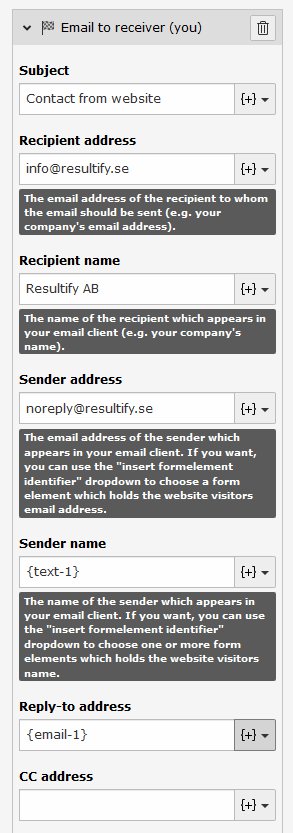
7.4.3Email to receiver (7.4.4) - this posting feature sends an email with form input to you / your company. Subject, recipient address and sender address are mandatory fields, other fields are optional. It is recommended to add a noreply address to the sender address and to Reply-to it is advantageous to select the form e-mail field, so that you can easily reply to the recipient from the inbox.
 7.4.4
7.4.4Redirect to a page (7.4.5) - this finisher allows you to redirect the visitor, after sending a message via the form, to a separate 'Thank you' page. First create a 'Thank you' page that is set to be hidden in the menu. Then you can create the link to the 'Thank you' page by using the PID (Page ID number, which you can find by hovering the cursor over the page icon of the page in the page tree) or you can just choose a page from the page-tree by clicking the 'Page' button.
 7.4.5
7.4.5Confirmation message (7.4.6) - this finisher gives you the opportunity to set some extra message for the visitor, who filled in the form succesfully (can be a simple "Thank you", "We will contact you" and so on.)
It is also possible to add some already existing content - through element id (this is often used when you wish to adjust confirmation message with some extra styling or you have specially designed content)
 7.4.6
7.4.6Save form after send (7.4.7) - this finisher will save the form data on designated page, pasting the page ID number or choosing the preferred storage page from the page tree by clicking 'Select storage' button.
 7.4.7
7.4.7Adding form to page
Create a new element on the page and go to the 'Form elements' tab. Select the 'Form' element (7.5.1)
 7.5.1
7.5.1In the 'General' tab you can see that the content element type 'Form' is selected (1).
The element uses the regular header field (2) and the header type/size can be set below (3). But note that the form name will also be shown as a header. It is possible to set alignment for the header (4) and in the link field (5) you can insert the link to any page of a site or to a file, or to another site or even to email (7.5.2)
 7.5.2
7.5.2After filling out the necessary parameters in the general tab, move on to the 'Plugin' tab. Here you need to choose the form (you created) by selecting it in the dropdown menu (7.5.3)
 7.5.3
7.5.3Press OK in the popup to apply selected form template (7.5.4)
 7.5.4
7.5.4this is how the added form will look in BE (7.5.5) and by checking the 'Override finisher settings' checkbox, you are able to refresh fast of specific finishers for this particular form if you previously made changes.
 7.5.5
7.5.5Deleting form
Simply select 'Forms' in the control panel, and use the trash can icon to delete a form (7.6.1)
 7.6.1
7.6.1